This is just a quick update to announce another update to my Drop-Down Controls project. By request (and because I always enjoy a challenge), i’ve added custom DataGridView column types for the ComboTreeBox and GroupedComboBox controls. This means that you can now use these controls from within a DataGridView, taking advantage of the automatic support for reading/writing to a data source that comes with it.

Drop-Down Column Types

Creating custom column types

The general process for implementing a custom DataGridView column type is as follows:

  • Create a class that derives from DataGridViewColumn that will represent the column and properties that apply to all of its cells. Be sure to override the Clone method.
  • Create a class that derives from DataGridViewCell that will represent the individual cells, including any properties that override those inherited from the column. As above, override the Clone method. You will also need to override the Paint method to draw the cell’s “normal” appearance (i.e. when the cell is not in edit mode). In the constructor for the column class, set the CellTemplate property to a new instance of the cell class.
  • Create a class that derives from Control and implements the IDataGridViewEditingControl interface, which will be responsible for editing a cell’s value. (Alternatively, the cell can implement the IDataGridViewEditingCell interface if it provides in-place editing… but this is only useful when the editing UI is very simple.) Override the EditType property of the cell class to return the type of the editing control. Also override the InitializeEditingControl method to set the initial value of the control and set up any other behaviours.

In all of the above, you can use a more derived base class than those mentioned (e.g. DataGridViewTextBoxColumn, DataGridViewComboBoxCell, DateTimePicker, etc). In this case, since I already have controls to use as editors, I will extend those. However, for the column and cell classes, it’s easier to start from scratch.

GroupedComboBoxColumn

The first custom column type I added is based on my GroupedComboBox control. Itself extending the built-in ComboBox control, it behaves very much like the DataGridViewComboBoxColumn. However, because the control does some custom painting and manipulation of the data source, it was easier to implement separately from the built-in column type.

Unlike the built-in column, there is no Items property on this column type. Since the grouping functionality relies on being bound to a data source, it makes sense to do this exclusively via the DataSource property. As with the GroupedComboBox itself, you can set the DisplayMember, ValueMember and GroupMember properties to control how the list items behave. All of these properties are optional (although you will not get the grouping behaviour unless you set the latter one).

You can override all of these properties for individual cells; setting the cell’s properties to null (the default) will cause the values to be inherited from the owning column.
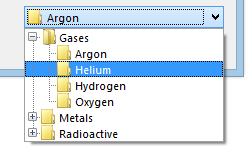
ComboTreeBoxColumn

Secondly, the other column type is based on my ComboTreeBox control. There are various challenges associated with populating hierarchical views from flat lists/tables:

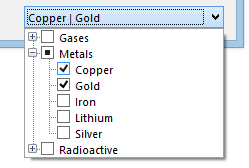
The nodes displayed in the drop-down for this column type must be set manually. As with the previous column type, however, you can override the Nodes property for cells on an individual basis (controlled by the UseColumnNodes property).

In terms of actually selecting nodes, the underlying value type for cells in the ComboTreeBoxColumn is simply String. You select a specific node by its path, the format of which is determined by both the PathSeparator and UseNodeNamesForPath properties. This is also used for the formatted value of the cells. The cell itself can display either the path or the node text, depending on the value of ShowPath. All of this means that the underlying cell values (and therefore the values in the data source for the grid) must be path strings.

e.g. The path string Fruit\Citrus\Orange selects the node with the text “Orange” whose immediate parent node is “Citrus” and whose grandparent node is “Fruit”.

Path strings can be translated to/from ComboTreeNode via the GetFullPath and GetNodeAt methods on the ComboTreeBox control.

Download

The latest version of the drop-down controls can be downloaded from the project page.

In an earlier article, I developed a set of managed wrapper classes for the Text Object Model (TOM); the API that underpins the RichEdit/RichTextBox control and provides an object model that is document-centric (rather than selection-centric, like the controls themselves). With it, you can efficiently manipulate rich text and, using the managed classes, do so from within a C# (or other .NET) project.

With Windows 8 came an update to the Text Object Model; TOM 2 includes enhancements such as:

  • Documents containing multiple stories
  • Default character and paragraph formatting
  • East Asian language and UTF-32 support
  • Object properties
  • Build-up/build-down operations for math text
  • Additional character effects and paragraph styles
  • Image insertion
  • Basic support for tables
  • Mechanism for manipulating rich text strings separately from the document

The TOM 2 functionality can also be used on earlier versions of Windows where Office 2013 is present; the document instance must be obtained from the RichEdit control that ships with Office in this scenario. This is preferred even on Windows 8, as the Office implementation is generally more complete than the RichEdit control included with the OS. (For example, the basic implementation does not include support for math text)

Extending the TOM classes

The TOM 2 functionality is exposed by a set of COM interfaces that extend the original Text Object Model interfaces; for example, ITextDocument2 extends ITextDocument, ITextRange2 extends ITextRange, etc. For my managed wrappers, I decided that each of the existing classes should encapsulate the functionality of both interfaces; attempting to access unsupported functionality will result in an exception. Adding a SupportedVersion property allows the caller to check for feature support and gracefully degrade.

When constructing each object, we call the QueryInterface method on the IUnknown interface of the underlying COM object to see if the newer TOM interface is implemented; otherwise the older interface is used; e.g:

ITextDocument* doc = NULL;
HRESULT hr1 = punk->QueryInterface(__uuidof(ITextDocument), (void**)&doc);
			
ITextDocument2* doc2 = NULL;
HRESULT hr2 = punk->QueryInterface(__uuidof(ITextDocument2), (void**)&doc2);			

punk->Release();
			
if (FAILED(hr1)) Marshal::ThrowExceptionForHR(hr1);

if (SUCCEEDED(hr2)) {
    // use ITextDocument2...
}
else {
    // use ITextDocument...
}

Most of the new methods and properties are implemented by calling the corresponding method on the COM object and converting between native and managed data types. In practice, this means that:

  • long values are implicitly converted to/from System.Int32
  • Enumerations are cast to the appropriate System.Enum type
  • BSTR values are marshalled to/from System.String
  • IStream objects are created from System.IO.Stream objects (by allocating a block of unmanaged memory and copying the data to it)
  • HRESULT values (other than S_OK and S_FALSE) cause managed exceptions to be thrown

As with the original managed wrappers, I endeavoured to translate from Win32/COM terminology to .NET nomenclature; for example:

  • Duplicate becomes Clone
  • IsEqual becomes Equals (also implementing IEquatable<T>)
  • Get/Set methods become properties
  • 1-based indexes are translated to 0-based indexes
  • Start/End positions are translated to Start & Length

The TOM 2 interfaces include some methods that replace methods from the original interfaces; e.g. GetDuplicate2. In the case of these, the wrapper class provides a single managed method that checks which interface is implemented, and then calls the appropriate native method.

Also as before, all TOM classes implement IDisposable to allow unmanaged resources to be released when they are no longer required.

Obtaining a TOM 2 document

An instance of the ITextDocument2 interface must be obtained from a RichEdit control; however, the Windows Forms RichTextBox control loads version 2.0 of the RichEdit control and does not support TOM 2, even on Windows 8. Basic TOM 2 functionality is provided by version 4.1 of the control, located in MSFTEDIT.DLL (which ships with Windows). Full TOM 2 functionality requires the RichEdit control that ships with Office 2013, so called “RichEdit 8” (the window class name is actually RICHEDIT60W).

By subclassing the RichTextBox control and overriding the CreateParams property, we can force a different version of the RichEdit control to be loaded. This trick involves using the native LoadLibrary method to load the DLL containing the control (either MSFTEDIT.DLL or RICHED20.DLL) and then changing the ClassName property to select the correct version; e.g:

virtual property System::Windows::Forms::CreateParams^ CreateParams {
    System::Windows::Forms::CreateParams^ get() override {
        LoadLibrary("C:\\Program Files\\Common Files\\Microsoft Shared\\OFFICE15\\RICHED20.DLL");
        System::Windows::Forms::CreateParams^ cp = RichTextBox::CreateParams;
        cp->ClassName = "RICHEDIT60W";
        return cp;
    }
}

In doing so, the platform of the calling process must match that of the DLL being loaded; e.g. a 64-bit application must load the DLL from the 64-bit version of Office.

Included with the managed TOM classes is the RichTextBoxEx control, which uses the above trick (as well as some querying of the Windows registry) to load the best available version of the native RichEdit control. With this control, you can obtain a TOM 2 document with very few lines of C# code:

using (RichTextBoxEx rtb = new RichTextBoxEx()) {
    TextDocument doc = TextDocument.FromRichTextBox(rtb);
    Console.WriteLine("Supported version is {0}", doc.SupportedVersion);
}

Math functionality

One of the key areas of functionality offered by TOM 2 concerns math text. The most notable feature is being able to convert a linear-form equation (i.e. consisting of a string of Unicode characters, or other text which can be interpreted by the TOM engine) into a built-up form (i.e. consisting of inline math objects, with full formatting) – and back again. These transformations are applied using the BuildUpMath and Linearize methods. A range of enumeration values/flags control this process. Also included is the ability to “fold” complex alphabetic characters into their plain text equivalents (using the new version of the GetText method).

e.g. BuildUpMath transforms the following Unicode string:

f(x)=a_0+∑_(n=1)^∞▒(a_n cos⁡〖nπx/L〗+b_n sin⁡〖nπx/L〗

…into the following built-up math text:

built-up-math

By request, I have extended the built-in TOM functionality by adding conversions from built-up math text to two common XML-based markup formats:

  • Office MathML (OMML) – Math RTF and OMML are very similar; the conversion parses the RTF and makes the necessary transformations to produce the XML output.
  • W3C MathML (MML) – The conversion leverages the XSL stylesheet included with Microsoft Office which translates OMML into MML.

The MathML code generated for the previous example is:

<mml:math xmlns:mml="http://www.w3.org/1998/Math/MathML" xmlns:m="http://schemas.openxmlformats.org/officeDocument/2006/math">
  <mml:mi>f</mml:mi>
  <mml:mfenced separators="|">
    <mml:mrow>
      <mml:mi>x</mml:mi>
    </mml:mrow>
  </mml:mfenced>
  <mml:mo>=</mml:mo>
  <mml:msub>
    <mml:mrow>
      <mml:mi>a</mml:mi>
    </mml:mrow>
    <mml:mrow>
      <mml:mn>0</mml:mn>
    </mml:mrow>
  </mml:msub>
  <mml:mo>+</mml:mo>
  <mml:mrow>
    <mml:msubsup>
      <mml:mo stretchy="false">∑</mml:mo>
      <mml:mrow>
        <mml:mi>n</mml:mi>
        <mml:mo>=</mml:mo>
        <mml:mn>1</mml:mn>
      </mml:mrow>
      <mml:mrow>
        <mml:mi>∞</mml:mi>
      </mml:mrow>
    </mml:msubsup>
    <mml:mrow>
      <mml:mfenced separators="|">
        <mml:mrow>
          <mml:msub>
            <mml:mrow>
              <mml:mi>a</mml:mi>
            </mml:mrow>
            <mml:mrow>
              <mml:mi>n</mml:mi>
            </mml:mrow>
          </mml:msub>
          <mml:mrow>
            <mml:mrow>
              <mml:mi mathvariant="italic">cos</mml:mi>
            </mml:mrow>
            <mml:mo>⁡</mml:mo>
            <mml:mrow>
              <mml:mfrac>
                <mml:mrow>
                  <mml:mi>n</mml:mi>
                  <mml:mi>π</mml:mi>
                  <mml:mi>x</mml:mi>
                </mml:mrow>
                <mml:mrow>
                  <mml:mi>L</mml:mi>
                </mml:mrow>
              </mml:mfrac>
            </mml:mrow>
          </mml:mrow>
          <mml:mo>+</mml:mo>
          <mml:msub>
            <mml:mrow>
              <mml:mi>b</mml:mi>
            </mml:mrow>
            <mml:mrow>
              <mml:mi>n</mml:mi>
            </mml:mrow>
          </mml:msub>
          <mml:mrow>
            <mml:mrow>
              <mml:mi mathvariant="italic">sin</mml:mi>
            </mml:mrow>
            <mml:mo>⁡</mml:mo>
            <mml:mrow>
              <mml:mfrac>
                <mml:mrow>
                  <mml:mi>n</mml:mi>
                  <mml:mi>π</mml:mi>
                  <mml:mi>x</mml:mi>
                </mml:mrow>
                <mml:mrow>
                  <mml:mi>L</mml:mi>
                </mml:mrow>
              </mml:mfrac>
            </mml:mrow>
          </mml:mrow>
        </mml:mrow>
      </mml:mfenced>
    </mml:mrow>
  </mml:mrow>
</mml:math>

Other extensions

My implementation also contains some extension methods which allow TextRange objects to be used like the familiar StringBuilder class; i.e. Append, AppendLine, Insert and Remove.

Download

You can download the latest version of my TOM Classes for .NET from the project page.

This article is also available as a video, courtesy of Webucator. Click here to jump to the video section below.


For many data types, sorting is a logical, deterministic operation that works by comparing elements and determining whether they are less-than, greater-than or equal-to each other. For example, with a list of integers, we can simply use the <, > and == operators to perform the comparisons. With DateTime values, we might first convert them into UTC/GMT, then to their fundamental form, ticks (i.e. the number of 100-nanosecond intervals that have elapsed since DateTime.MinValue), then compare them as we did with integers.

With strings, however, things get more complicated. One must first decide on what basis we perform the comparison: Is it case-sensitive or case-insensitive? Are accented characters considered equal to their unaccented equivalents? If not, how do they compare? Are there language/regional/cultural factors to consider? Are there cases where two consecutive characters are read as if they were just one?

Thankfully, the .NET Framework supports a wide range of string comparisons and therefore several choices when it comes to sorting. The built-in StringComparer implementations are CurrentCulture, CurrentCultureIgnoreCase, InvariantCulture, InvariantCultureIgnoreCase, Ordinal and OrdinalIgnoreCase. Because I develop exclusively within a single locale and language, my preferred implementation is OrdinalIgnoreCase, which equates uppercase and lowercase letters while comparing the rest according to their order in the character set (i.e. digits before letters, with symbols on either side).

The problem with the built-in comparisons is that they operate on (broadly speaking) an alphabetical basis. Even when we desire strings to appear in alphabetical order, we do not always intend for such a literal interpretation; i.e. the following strings are sorted in alphabetical order, but not in the order a human would place them:

  • “1. Introduction”
  • “10. Summary”
  • “11. Notes”
  • “2. Oranges”
  • “3. Apples”
  • “4. Berries”

Similarly, we might have a list of strings which contain both alphabetical and numerical terms, expressed naturally:

  • “3rd man”
  • “Fifty-third page”
  • “First chase”
  • “First place”
  • “Four people”
  • “Second place”

A more sophisticated comparer is required if we are to sort strings of this kind in a logical order.

My Approach

My implementation works by breaking strings into tokens (i.e. words comprised of both letters and numbers, but not whitespace or punctuation) and, where recognised, assigning a numerical value to them. If not recognised, a token is compared alphabetically/lexicographically. I look for the following types of tokens:

  • Digit strings (including those with currency symbols, digit grouping symbols and decimal points), e.g. "123", "$123.00", "100,000"
    – These are converted using the Decimal.TryParse() method.
  • Ordinal digit strings; e.g. "1st", "2nd", "3rd", "100th"
    – After removing the suffix, the same process as above applies.
  • Words which translate directly into a number; e.g. "one", "two", "twenty"
    – These are matched individually to a decimal constant.
  • Ordinal words which translate directly into a number; e.g. "first", "third", "fifteenth"
    – As above.
  • Multiple consecutive words expressing a larger number; e.g. "nine hundred", "twenty-seven", "eight million, one hundred thousand, seven hundred and sixty six"
    – For these, we look ahead to the next token and, if necessary, add or multiply the numerical values together.

How the Lookahead Algorithm Works

This is the algorithm that converts a string into a numerical value that can be used for comparisons:

  1. Split the string using the regular expression \b(.+?)\b
  2. For each token:
    1. Attempt to convert the token to a numerical value (value) and note the type of match;
      No match, digit string, word, ordinal word, the word "and"/"&", the add modifier and the multiply modifier (used later)
    2. If the match was a word or ordinal word (with or without modifiers) then:
      1. Push the numerical value onto a new stack and reset the value to zero
      2. While there are still tokens remaining:
        1. Get the next token
        2. Attempt to convert the token to a numerical value (next) and note the type of match
        3. If there was no match or a digit string was matched, abort
        4. Pop the top value off the stack (temp)
        5. If the multiply modifier was matched:
          1. Continue popping elements off the stack and adding them to temp until the result is non-zero (or the next element on the stack is less than next)
          2. Multiply temp by next
          3. Push temp onto the stack, followed by a zero
        6. If the add modifier was matched:
          1. Add next onto temp
          2. Push temp onto the stack
      3. Pop all elements off the stack, adding them onto value
    3. If the original match was valid, return value – we will use this value to compare the tokens
  3. If no value has been returned by this point, we will compare the tokens as though they were normal strings

In short: If a numerical value is matched, we look ahead until we reach the end or the value is no longer valid. Each successive token is added to the original value, however when a multiplier is found (e.g. “hundred”, “thousand”, etc) we continue accumulating values in the stack until we are ready to perform the multiplication; only then can the result be added on.

How the Comparisons Are Performed

  1. Split each string into tokens
  2. While there are tokens remaining in both strings:
    1. Run the lookahead algorithm (above), consuming tokens from each string
    2. If numerical values were found for both strings, compare numerically
    3. If a numerical value was only found for one string, convert the numerical value into a string and compare it with the other token
    4. If neither string contained a numerical value, compare normally
    5. If the result of the comparison was less-than or greater-than, return the result
  3. If no result was returned (i.e. numerical values were equal), compare the number of tokens consumed from each string and regard the shortest to be lesser
  4. If the result from the previous step was less-than or greater-than, return the result
  5. If no result was returned, compare the original strings normally and return the result

In short: Where numerical values can be obtained from the strings, we will compare these with each other (regardless of how much of the string we consume in doing so; only the value matters). Where numerical values are absent from one string, the other string takes precedence. Once no more numerical values can be obtained, the remainder of each string is compared normally.

Implementation

I implemented this functionality in a C# class named NaturalLanguageStringComparer, which implements both the generic (string) and non-generic (object) versions of the IComparer interface. This is the standard mechanism for comparators in the .NET Framework, which enables the class to be used in:

  • The List<T>.Sort(), ArrayList.Sort() and Array.Sort() methods to perform a one-off sort on a collection
  • When initialising a SortedList<TKey, TValue> or SortedDictionary<TKey, TValue> to keep the elements in the correct order
  • In LINQ queries (the OrderBy() extension method) to order a sequence

You can also call the ParseNatural() method to utilise the numerical conversion functionality directly.

Example

List terms = new List();
terms.Add("1");
terms.Add("fourth inkwell");
terms.Add("10");
terms.Add("2");
terms.Add("one hundred and three");
terms.Add("five");
terms.Add("7th saucepan");
terms.Add("third compass");
terms.Add("eight");
terms.Add("one hundred and thirty six");
terms.Add("zero");
terms.Add("twenty one");
terms.Add("five hundred");
terms.Add("fifth pencil");
terms.Add("22nd bucket");

NaturalLanguageStringComparer nlsc = new NaturalLanguageStringComparer();
terms.Sort(nlsc);

This produces the following result:
zero
1
2
third compass
fourth inkwell
fifth pencil
five
7th saucepan
eight
10
twenty one
22nd bucket
one hundred and three
one hundred and thirty six
five hundred

Download

NaturalLanguageSorting.zip (Visual Studio 2012 solution, includes example)

If you find my code useful, please consider making a donation.

Video

After initially publishing this article, I was contacted by Webucator, a US-based technology training provider. Their course, “C# Solutions from the Web” showcases a range of articles like this one. I was very gratified to hear that they were including a video based on my article. You can watch the video below and, if you find it interesting, visit the link to the aforementioned course.

You may remember quite an old post of mine about the shortcomings of ExtractAssociatedIcon() which, surprisingly, still gets a fair number of hits. In light of some of the feedback i’ve received since the original post, i’ve decided to update the code to include the following fixes and improvements:

Both methods in IconTools now use SHGetFileInfo

As was pointed out by Michael (no surname provided), the native SHGetFileInfo() function (which we were already using to get the icon for existing files) can also be used to get the icon for a file’s type. The additional flag SHGFI_USEFILEATTRIBUTES instructs the API not to attempt to access the file, and simply locates the icon by examining its attributes. It turns out that you can get away with passing a file extension directly to this function.

The more long-winded implementation based on the ExtractIconEx() function is no longer used. This also removes the need to access the Windows Registry to find the DefaultIcon key.

Handles are now released using DestroyIcon

Another commenter on the original post, Cobein, pointed out (quite correctly) that the managed Icon class does not automatically release handles to icons created using the FromHandle() method.

This posed a slight design challenge, in that users could not be expected to do this after they finished using the icon returned by the method in the IconTools class. To get around this, I decided to use the Clone() method to copy the icon, before releasing the native handle and returning the managed copy instead.

The GetIconForFile() method now looks like this:

public static Icon GetIconForFile(string filename, ShellIconSize size) {
   SHFILEINFO shinfo = new SHFILEINFO();
   NativeMethods.SHGetFileInfo(filename, 0, ref shinfo, (uint)Marshal.SizeOf(shinfo), size);

   Icon icon = null;

   if (shinfo.hIcon.ToInt32() != 0) {
      // create the icon from the native handle and make a managed copy of it
      icon = (Icon)Icon.FromHandle(shinfo.hIcon).Clone();

      // release the native handle
      NativeMethods.DestroyIcon(shinfo.hIcon);
   }

   return icon;
}

Example Usage

Usage remains unchanged; if you used the previous version of this code, it will continue to work as before.

Icon smallIcon = IconTools.GetIconForFile(
   @"C:\Windows\System32\notepad.exe",
   ShellIconSize.SmallIcon
);

Icon largeIcon = IconTools.GetIconForExtension(".html", ShellIconSize.LargeIcon);

Download

IconTools.cs

Thank you!

At the time of writing, my ComboTreeBox control is the most popular item on this blog. I never could have imagined that a simple Windows Forms control would attract so much attention on the web! All I can say to those who have read my article and downloaded my code is, “Thank you!” Your continued support gives me the motivation to keep writing new and interesting content.

New Project Page

With this in mind, i’ve decided to move both ComboTreeBox and GroupedComboBox to their own project page here: Drop-Down Controls

This gives them a permanent home and makes it easier for me to manage occasional updates and new features. As before, you can download binaries and source code for the controls, as well as an example application that shows off their potential.

New Enhancements

This reshuffling has given me an opportunity to release a few bugfixes, including a memory leak in the Buffered Paint code.

Normal ComboTreeBox ComboTreeBox with ShowCheckBoxes set

I also took the opportunity to enhance the ComboTreeBox control by adding a ShowCheckBoxes property. In this mode of operation, the normal selection rules are suspended and checkbox glyphs are drawn beside each node. You can then select multiple items, accessible via the CheckedNodes property. This is further aligns the functionality offered by the control with that of the built-in TreeView control.

Enjoy!