Text Object Model Demo

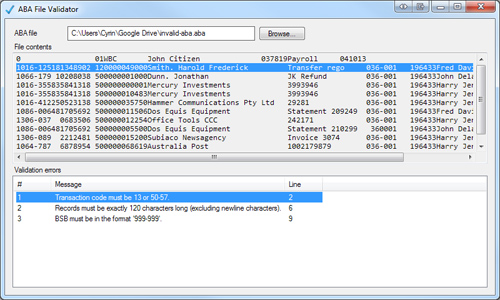
I’ve recently been doing a lot of work with the WinForms RichTextBox control, trying to implement the familiar red wavy underlines associated with spell-checking. After some research, I discovered that the underlying (native) RichEdit control used by the RichTextBox does in fact support this style of underlining. The catch? It is only accessible through the EM_SETCHARFORMAT window message, which requires PInvoke. While it is relatively simple to set this style, there are drawbacks:

  • High overheads associated with marshalling
  • Clunky operation, requires you to send the CHARFORMAT2 structure
  • You can only get/set the style for the selected text

The last point in particular is of most concern to me, and is a serious limitation of the RichTextBox control. Almost all of the rich text functionality is restricted to the text selected in the control. In practice, this means that any non-trivial text manipulation requires you to constantly store the current selection, select the text you wish to manipulate, apply the styles and then restore the old selection. This is slow and extremely inefficient.

I then looked into something called the Text Object Model (or TOM). This comprises a set of COM interfaces which are implemented by the underlying RichEdit control. The functionality exposed by these interfaces is quite similar to that of the Microsoft Word object model, where you have the concept of Document, Range, Selection and so on. Importantly, TOM allows you to operate on ranges of rich text without the need to alter the selection. It also provides access to a range of functionality not otherwise available for the RichTextBox control:

  • Granular selection by character, word, sentence and paragraph
  • Font weights, underline styles, all-caps
  • Tab stops, list styles, full justification of text
  • Find functionality, translation to/from screen coordinates

Using the Text Object Model

The TOM interfaces are:

  • ITextDocument – Represents a top-level document, from which text ranges can be obtained.
  • ITextRange – Represents a range of rich text. Ranges can be moved, resized and styled with ease.
  • ITextSelection – Special text range that represents the selected text in the control.
  • ITextFont – Character formatting options.
  • ITextPara – Paragraph formatting options.

It is relatively easy to obtain an instance of ITextDocument from a RichTextBox control. One simply sends the EM_GETOLEINTERFACE message to the control. There are a number of ways that you can interact with the object that gets returned:

  1. Use the dynamic keyword to access the object’s members – this requires the least programming effort, but introduces the possibility for errors and has a number of overheads.
  2. Define the TOM interfaces in managed code and use COM interop – this allows you to work in a strongly-typed manner, but still has the overheads associated with marshalling. Also, the interfaces themselves are not terribly .NET-friendly, and they lack some of the conveniences that would be familiar to most .NET developers.
  3. Write wrapper classes for each of the TOM interfaces – while this approach requires the most coding, the end result is a fast, efficient way of accessing the TOM functionality. The calling code does not have to use COM interop and the wrapper classes can translate unfriendly constructs into more .NET-friendly ones.

My solution

Needless to say, I settled for the 3rd option. I decided to implement the wrapper classes in a C++/CLI assembly, because this allowed me to access the TOM interfaces using native code, while ultimately exposing a set of managed classes. Well-written native code (that explicitly marshals data to managed code) will always be faster than COM interop, where the runtime has to apply more checks and is unable to make as many assumptions about the types it is operating on.

Some of the benefits offered by my wrappers include:

  • Managed enumerations to replace integer constants and flags
  • Properties to replace Get and Set methods
  • Translation of HRESULT codes into managed exceptions
  • Returning objects instead of pointers
  • Omission of TOM functionality not supported by the RichEdit control (e.g. text shadows, animation)
  • Use of more .NET-friendly types and nomenclature; e.g. IEquatable, ToString, IDataObject, Color and Point

The top-level class in my implementation is TextDocument, which wraps ITextDocument. It includes a static method which creates an instance from a RichTextBox control. Once created, you have full access to the Text Object Model functionality to manipulate the text inside the control.

Usage

Once obtaining a TextDocument instance from a RichTextBox control, working with formatted text is easy:

// create a RichTextBox control in the usual way
RichTextBox rtb = new RichTextBox();

// create a TOM document object (and enable advanced typography on the control)
TextDocument doc = TextDocument.FromRichTextBox(rtb, true);
TextRange range = doc.EntireRange;

// set some text
range.Text = "This is a piece of rich text.";
range.Font.Name = "Calibri";
range.Font.Size = 16f;

// find a word and apply formatting
range.FindText("piece");
range.Font.Bold = true;
range.Font.ForeColor = Color.Red;

// insert a tab
range.Collapse(RangePosition.End);
range.Text = "\t";

// resize range and apply more formatting
range.FindText("rich");
range.MoveEnd(TextUnit.Word, 2);
range.Font.UnderlineStyle = TextUnderlineStyle.Wave;
range.Font.UnderlineColor = TextUnderlineColor.Blue;

// append raw RTF using IDataObject
range.MoveEnd(TextUnit.Story, 1);
range.Collapse(RangePosition.End);
range.SetDataObject(new DataObject(
    DataFormats.Rtf, 
    @"{\rtf1\ansi\deff0\pard \par Here is some \ul more\ul0  rich text.\par}"
));

// set paragraph formatting
doc.EntireRange.Para.Alignment = TextAlignment.Center;

Download

Go to the project page here: TOM Classes for .NET

Final words

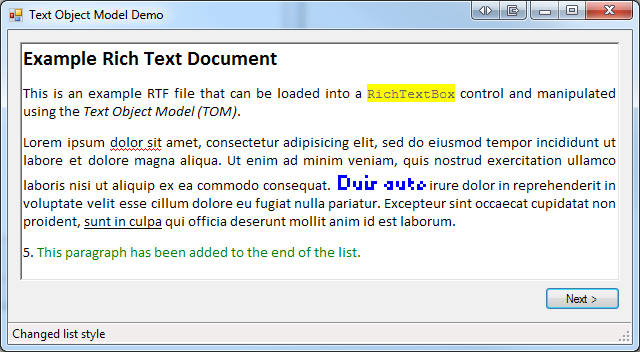
This set of managed wrapper classes for the Text Object Model provides a fast and efficient way to manipulate the text in a RichTextBox control. Importantly, it solves the limitation of only being able to apply styles to the selected text in the control. As an added bonus, it also provides access to a wider range of character and paragraph formats, as well as a number of convenience methods for working with ranges of formatted text. I hope you find it useful in your own rich text applications.

Additional resources

Text Object Model on MSDN
Rich Text Format Specification

Hi all,

Just a quick announcement to say that comments are working again.

It seems that the captcha plug-in I was using has been discontinued, including the server that validates the captchas themselves. I’ve replaced the old captcha plug-in with one that uses Google reCAPTCHA instead. This should be familiar to most users from other sites on the web. While I don’t like the clunky nature of most captchas, they are necessary on this blog given the amount of spam I receive.

Anyway, apologies for any inconvenience if you were unable to comment on an article. Everything should be fine now.

“Reader Mode” – we’ve all used it, and whether we recognise it by name (or one of its many others, such as autoscroll, middle-click scroll, etc), we’ve come to expect it from the software we use the most – web browsers, text editors, e-mail clients and more. However, if you’ve been living under a rock since the mainstream adoption of the wheel mouse, let me explain how it works:

You activate Reader Mode by middle-clicking on a scrollable container/control. A glyph appears on the window in the location where you pressed the mouse button and the cursor changes to a scroll symbol. As you move the pointer away from the glyph, the display begins to automatically scroll in that direction. The further you move the pointer from the original location, the faster the display scrolls. (You can slow down the scroll rate by moving the pointer closer to the glyph.) This offers an alternative to continuously rotating the mouse wheel, allowing you to scroll through content while keeping your hand still.

Reader Mode behaves slightly differently depending on whether you release the middle button straight away, or keep it held down while scrolling. If the former is true, it goes into a sort-of “hands-free” mode where you must click again to exit. In the latter situation, it terminates when you release the middle mouse button.

DataGridViewRM example

Reader Mode in Windows Forms

Very few Windows Forms controls support Reader Mode as-is; the only ones i’m aware that do are RichTextBox and WebBrowser. Many more controls could benefit from Reader Mode support, such as:

  • Panel
  • PictureBox
  • ListView
  • TreeView
  • DataGridView

It’s the latter of those that I will focus on in this article.

Adding Reader Mode support

So, how do we add support for Reader Mode to a control that doesn’t already have it? You might be tempted to just implement it from scratch (handling mouse events, calculating offsets, etc), but there are many reasons why this is inadvisable:

  • Re-inventing the wheel
  • Subtle differences in behaviour easily introduced
  • Will not adapt to changes in the standard implementation
  • More complex using pure Windows Forms

Thankfully, there is an API for Reader Mode which can be imported from the Windows Common Controls library (comctl32.dll). It consists of:

  • READERMODEINFO structure – For configuring Reader Mode behaviour.
  • DoReaderMode() function – Puts the control into Reader Mode.
  • TranslateDispatch callback – Redirects window messages while in Reader Mode, allowing you to handle them independently of normal control behaviour.
  • ReaderScroll callback – Does the grunt work, notifying the control to start scrolling or update its scroll rate.
[DllImport("comctl32.dll", SetLastError = true, EntryPoint = "#383")]
public static extern void DoReaderMode(ref InteropTypes.READERMODEINFO prmi);

public delegate bool TranslateDispatchCallbackDelegate(ref Message lpmsg);

public delegate bool ReaderScrollCallbackDelegate(ref READERMODEINFO prmi, int dx, int dy);

[Flags]
public enum ReaderModeFlags {
    None = 0x00,
    ZeroCursor = 0x01,
    VerticalOnly = 0x02,
    HorizontalOnly = 0x04
}

[StructLayout(LayoutKind.Sequential)]
public struct READERMODEINFO {
    public int cbSize;
    public IntPtr hwnd;
    public ReaderModeFlags fFlags;
    public IntPtr prc;
    public ReaderScrollCallbackDelegate pfnScroll;
    public TranslateDispatchCallbackDelegate fFlags2;
    public IntPtr lParam;
}

The basic life cycle for Reader Mode, therefore, is:

  1. In the handler for the control’s MouseDown event, check for the middle mouse button and:
    1. Display a glyph at the location the mouse button was pressed (i’m using a PictureBox for this).
    2. Activate the mechanism used to auto-scroll the control (i’m using a Timer for this).
    3. Initialise and enter Reader Mode by calling DoReaderMode().
  2. The user will move the mouse pointer. In the ReaderScroll callback:
    1. Store the delta values (dx, dy) so that they are visible to the auto-scroll mechanism (Timer).
    2. If either of the values changes from zero, we will need to exit Reader Mode when the mouse button is released.
  3. At regular intervals (~25ms), the auto-scroll mechanism must:
    1. Increment (or decrement) the horizontal and/or vertical scroll bar offsets in proportion to the delta values from the previous step.
  4. The user will either release the mouse button or, in “hands-free” mode, click again. In the TranslateDispatch callback:
    1. If the window message corresponds to an event that will exit Reader Mode, stop the auto-scroll mechanism and hide the glyph.
    2. Depending on the type of event, either allow the default Reader Mode implementation to handle the message or handle it ourselves.
  5. Reader Mode will exit based on its own internal logic.

Default Reader Mode implementation

The default Reader Mode implementation is very simplistic. It will not draw the glyph, scroll the control (although it does generate the delta values) and it behaves slightly differently from the “standard” behaviour we see in most applications:

  • No “hands-free” mode; Reader Mode always exits when the middle mouse button is released
    • We can overcome this by preventing the default implementation from handling the MouseUp event until the delta values change
  • Stops responding to user input if the mouse pointer leaves the bounds of the control’s parent window
    • This is avoided by preventing the default implementation from handling the MouseLeave event
  • Only sends non-zero delta values when the pointer goes outside the ‘scrolling area’
    • Conventional behaviour is restored by setting the ‘scrolling area’ to the bounds* of the glyph (instead of the bounds of the control)

* – Note that the rectangle structure expected by Reader Mode is expressed in terms of left, top, right and bottom (rather than the conventional left, top, width, height representation). This gave me a nasty surprise the first time around.

Applying Reader Mode to the DataGridView

The DataGridView control is an excellent candidate for Reader Mode; scrolling through pages of tabular data can be a real pain, and the additional of Reader Mode functionality would help to make the control more user-friendly.

The easiest method is to subclass the control. I’ve created a child class called DataGridViewRM which adds the Reader Mode functionality and allows it to be toggled on/off via a design-time property. This effectively makes it a drop-in replacement for the original control.

As I eluded to above, we need to add some child controls to facilitate the behaviour; a PictureBox and a Timer. These must be initialised in the constructor and released in the control’s Dispose() method.

In terms of actually scrolling the control, the DataGridView uses its own logic (although its scroll bar controls are publicly-accessible, manipulating them does not scroll the control properly). It exposes two properties to allow the scroll offsets to be changed; HorizontalScrollingOffset and VerticalScrollingOffset. Unfortunately, through a quirk in Windows Forms, the latter property does not have a set accessor. Thankfully, it can be accessed using reflection:

// for better performance, retrieve this only once (in the constructor)
PropertyInfo setVerticalScrollingOffset 
    = GetType().GetProperty("VerticalOffset", BindingFlags.NonPublic | BindingFlags.Instance);

[Browsable(false)]
public new int VerticalScrollingOffset {
    get {
        return base.VerticalScrollingOffset;
    }
    set {
        setVerticalScrollingOffset.SetValue(this, value, null);
    }
}

All that remains is to handle the MouseDown event:

protected override void OnMouseDown(MouseEventArgs e) {
    if (ReaderModeEnabled) {
        if (e.Button == MouseButtons.Middle) {
            DataGridView.HitTestInfo hit = HitTest(e.X, e.Y);

            // reader mode should only be activated when the button 
            // is clicked over the scrollable part of the control
            switch (hit.Type) {
                case DataGridViewHitTestType.Cell:
                case DataGridViewHitTestType.HorizontalScrollBar:
                case DataGridViewHitTestType.None:
                case DataGridViewHitTestType.VerticalScrollBar:
                    // position and show the PictureBox
                    // start the Timer
                    // call DoReaderMode()
                    return;
                }
            }
        }

        // otherwise, process the event normally
        base.OnMouseDown(e);
}

The rest of the Reader Mode implementation falls within the callback methods and the Timer‘s Tick handler, as outlined earlier. You can view the complete implementation by downloading the source code below:

Download

Source code (Visual Studio 2012 solution, .NET Framework 4.0 – includes example application)

Final words

I hope you find this enhanced DataGridView control useful; it demonstrates just one of many controls that can be modified to support Reader Mode. I hope my explanation makes it easy for you to implement Reader Mode in your own controls.

Since the introduction of the wheel mouse, being able to operate scroll bars without the need for precision or the use of the mouse buttons has proven to be a godsend. User interfaces became friendlier and smoother as a result.

Unfortunately, the default handling of the MouseWheel event in Windows Forms is at-odds with the average user’s expectation about how and when this event should fire. In the vast majority of applications which support the mouse wheel, users expect to be able to affect a scrollable control or panel by simply moving the mouse over it and rotating the wheel. In WinForms, however, the MouseWheel event will only fire if the control has focus. In practice, this adds an unnecessary extra click to the process of using the mouse wheel and hinders the convenience offered by the wheel in the first place.

Thankfully, it is very simple to alter this behaviour and bring it in line with the user’s expectations. Better still, it is an application-wide solution and requires no changes to any control, panel or form.

The mechanism employed here is known as a message filter. Whenever the application receives a window message (the basic primitive used by all Win32 applications to handle interactivity, painting, events, etc), it is first passed to the message filter’s PreFilterMessage() method. Returning true from this method prevents the message from being processed in the normal way.

Our solution intercepts the WM_MOUSEWHEEL message, which is sent to the application when it is active and the user rotates the mouse wheel. Using the native method WindowFromPoint(), we can determine which control is under the mouse pointer at the time. We can then call another native method, SendMessage(), to send a copy of the original message to that control, allowing it to be processed as if the control was in focus at the time.

internal class MouseWheelMessageFilter : IMessageFilter {

    const int WM_MOUSEWHEEL = 0x20a;

    public bool PreFilterMessage(ref Message m) {
        if (m.Msg == WM_MOUSEWHEEL) {
            // LParam contains the location of the mouse pointer
            Point pos = new Point(m.LParam.ToInt32() & 0xffff, m.LParam.ToInt32() >> 16);
            IntPtr hWnd = WindowFromPoint(pos);
            if (hWnd != IntPtr.Zero && hWnd != m.HWnd && Control.FromHandle(hWnd) != null) {
                // redirect the message to the correct control
                SendMessage(hWnd, m.Msg, m.WParam, m.LParam);
                return true;
            }
        }
        return false;
    }

    // P/Invoke declarations
    [DllImport("user32.dll")]
    private static extern IntPtr WindowFromPoint(Point pt);
    [DllImport("user32.dll")]
    private static extern IntPtr SendMessage(IntPtr hWnd, int msg, IntPtr wp, IntPtr lp);
}

All we need do to use the message filter is to add the following line somewhere in the initialisation of the program (e.g. in the Main() method):

Application.AddMessageFilter(new MouseWheelMessageFilter());

This technique works for almost every type of control. A notable exception is the WebBrowser control, which uses its own logic to handle the rotation of the mouse wheel.

Use this code and enjoy the improvement in the usability of your application!