This article concerns the generation of simple diagrams containing a series of interconnected nodes. Often, simple diagrams such as these can add a new dimension of usability to a data-driven application. For example, you can:

  • Show the connections between related entities (e.g. people and relationships)
  • Visualise complex structures (e.g. tree data structures)
  • Follow logic flows and sequences (e.g. flow charts)
  • Produce a navigation map (e.g. for a website)

An ever-present challenge in dynamically-generating diagrams, however, is the layout of the nodes. Aesthetics dictate the need for uniform spacing between nodes, radial distribution and minimal crossing of lines (among other things), yet these are very difficult to achieve using ‘blind’ techniques (rule-based layouts and other algorithms that position nodes without considering the overall diagram).

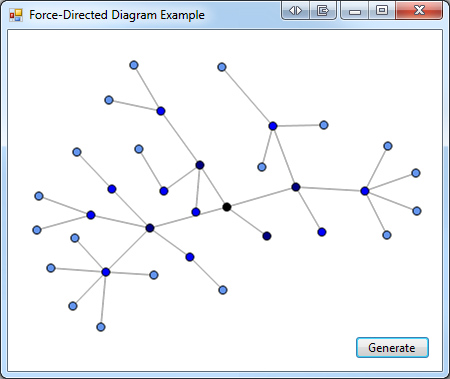
Force-directed algorithms present an exciting solution to this problem. Here, simple mechanical forces are applied to the diagram (essentially by running a physics simulation), resulting in a layout that exhibits the properties of emergent complexity. The appropriate selection of forces and formulae are capable of producing layouts that meet the aesthetic goals outlined above. In their purest form, force-directed algorithms balance the forces of charged-particle repulsion between each node (Coulomb’s Law) and spring attraction between each pair of connected nodes (Hooke’s Law). After a number of iterations (each representing a slice of time during which the forces act upon the nodes), an equilibrium is reached and the layout process is complete.

A diagram produced with the force-directed algorithm

I have implemented a force-based layout algorithm in C# and GDI+. It provides a simple Diagram class which acts as a container for descendants of the Node abstract class. The structure and layout of the diagram is separated from the rendering, which is fully overridable. The implementation is not tied to Windows Forms, but is fully compatible, so diagrams can either be drawn onto a System.Windows.Forms.Control (for display and interactivity) or directly onto a System.Drawing.Bitmap (for exporting).

Classes
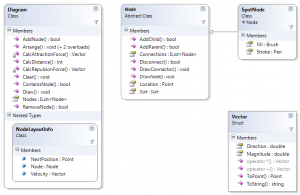
Class diagram (click for full-size)

Node

Node is the base class for a node on the diagram. Conceptually, it has a Location on the cartesian plane and a series of Connections to other nodes on the diagram. It also makes provision for a Size (used when rendering) and abstract functionality for drawing both the node and its (child) connections. Connections between nodes can be hierarchical (parent-child) or two-way. If a diagram contains a mixture of different derived types, parent nodes are responsible for drawing the connections to their children (although a base implementation is provided).

SpotNode is an example concrete implementation of Node that has additional visual properties and contains logic to draw itself as an 8×8 circle.

Diagram

Diagram serves as both a collection of Node objects and the layout provider. The implementation of the force-directed algorithm resides in this class. Although it performs no painting itself, it provides a Draw() method that scales the diagram to match a drawing surface and instructs each node to draw in the correct bounds.

It also defines a nested class, NodeLayoutInfo, which tracks the mechanical properties (velocity, future coordinates) of each node during the force-based simulation.

Vector

I developed the Vector structure as part of an earlier project. It models (on a basic level) a vector whose Magnitude and Direction are System.Double, with the direction expressed in degrees. It uses operator overloading to support vector addition and scalar multiplication. In the force-based algorithm, it is necessary to calculate and express the forces acting on each node in terms of both magnitude and direction, hence a vector representation is desirable.

The Layout Algorithm

At the heart of the force-directed algorithm are the methods that calculate the forces themselves:

The repulsion force is exerted by every node in the diagram, and each node is repelled (however slightly) by every other node in the diagram. This force is likened to the repulsion of charged particles, and so it is based on Coulomb’s Law; F = k(Q1Q2/r2) – where k is a constant, Q is the charge and r is the distance between the particles. Since all of our nodes are equivalent, we can ignore the charge term. In other words, as the distance between the nodes increases, the repulsion force decreases quadratically. This calculation is performed in the CalcRepulsionForce() method:

private Vector CalcRepulsionForce(Node x, Node y) {
	int proximity = Math.Max(CalcDistance(x.Location, y.Location), 1);

	double force = -(REPULSION_CONSTANT / Math.Pow(proximity, 2));
	double angle = GetBearingAngle(x.Location, y.Location);

	return new Vector(force, angle);
}

The attraction force is exerted on each node by the nodes that are connected to it; isolated nodes are therefore unaffected by this force. The connectors between the nodes are regarded as spring-like, hence the force calculated using Hooke’s Law; F = −kx – where k is a constant and x is the difference between the length of the spring and the distance between the nodes (i.e. the extension of the spring). In other words, as the distance between the nodes increases, the force pulling them back together increases proportionally (at least until the spring is fully relaxed, in which case the force stops applying). This calculation is performed in the CalcAttractionForce() method:

private Vector CalcAttractionForce(Node x, Node y, double springLength) {
	int proximity = Math.Max(CalcDistance(x.Location, y.Location), 1);

	double force = ATTRACTION_CONSTANT * Math.Max(proximity - springLength, 0);
	double angle = GetBearingAngle(x.Location, y.Location);

	return new Vector(force, angle);
}

The force-directed algorithm applies these forces to the nodes via an iterative simulation, as follows:

  1. Randomise the initial coordinates of each Node – even a tiny variation will be sufficient.
  2. Until the maximum number of iterations is exceeded (or the stop condition is satisfied):
    1. Initialise the totalDisplacement to zero.
    2. For each node:
      1. Initialise the netForce Vector to zero.
      2. Call CalcRepulsionForce() on every other node in the diagram, adding the result to netForce.
      3. Call CalcAttractionForce() on every node connected to the current node, adding the result to netForce.
      4. Add netForce to the node’s velocity vector.
      5. Let the node’s new position be set to the vector sum of its current position and its velocity.
    3. For each node:
      1. Calculate the displacement caused by moving the node to its new position, adding the result to totalDisplacement.
      2. Move the node to its new position.
    4. If totalDisplacement is less than a threshold value, trigger the stop condition.
  3. Offset each node such that the diagram is centered around the origin (0,0). (During iteration, the diagram may creep.)

Usage Examples

Drawing a basic diagram to a bitmap

Diagram diagram = new Diagram();

// create some nodes
Node fruit = new SpotNode();
Node vegetables = new SpotNode();
Node apple = new SpotNode(Color.Green);
Node orange = new SpotNode(Color.Orange);
Node tomato = new SpotNode(Color.Red);
Node carrot = new SpotNode(Color.OrangeRed);

diagram.AddNode(fruit);
diagram.AddNode(vegetables);

// create connections between nodes
fruit.AddChild(apple);
fruit.AddChild(orange);
fruit.AddChild(tomato);
vegetables.AddChild(tomato);
vegetables.AddChild(carrot);

// run the force-directed algorithm
diagram.Arrange();

// draw to a Bitmap and save
Bitmap bitmap = new Bitmap(640, 480);
Graphics g = Graphics.FromImage(bitmap);
diagram.Draw(g, new Rectangle(Point.Empty, bitmap.Size));
bitmap.Save("demo.bmp");

Sample application

In the source code package (at the bottom of the article), I have included a simple Windows Forms application that demonstrates how to generate a random hierarchical diagram and paint it persistently on a Form. The layout is performed in a separate thread, and can optionally be displayed in a real-time, animated fashion.

Final Words

Force-directed algorithms are not perfect when it comes to arranging the nodes on a diagram; they are subject to conforming to local extremes rather than finding a 100%-optimal layout. This means that diagrams with a large number of nodes will typically have a higher occurrence of crossed lines. However, even when a less-optimal result is obtained, said result is often still visually striking. Running time can be a problem with particularly dense diagrams, but as already discussed, simpler diagrams produce a more aesthetically-pleasing result anyway. In most practical applications, a force-based approach provides a very good result for dynamically-generated diagrams.

With respect to my implementation, it is a very bare-bones approach, but it is also very scalable; for example, if appropriate node subclasses were written, it could be used to produce flow-charts, people-relationship diagrams, site maps for websites, brainstorming charts or even database diagrams (with some additional functionality). The ability to automatically generate such diagrams can open up a whole new world in terms of application usability, data analysis and the production of deliverables.

A force-directed algorithm will definitely drive my future diagramming/graphing projects.

Download

If you find my code useful, please consider making a donation.

ForceDirected.zip – rev 1 (source code and example application)

  • 2013/02/24 – Improved Vector class by replacing Math.Tanh() approach with Math.Atan2()

Vector.zip (drop-in replacement for the Vector class above)

  • 2015/02/28 – Added an alternative Vector implementation that produces a ~33% performance boost

The Windows Forms ComboBox control is an excellent user interface component for situations where you want to present the user with a discrete set of choices, or invite them to enter an arbitrary string value. It does not pose much of a usability challenge; inherently, the control is intuitive and easy to use. However, there are occasions when the usability of an application can be greatly improved by arranging the user’s options into groups or categories. This is particularly useful when the number of options is large, or when there is a risk of ambiguity in the wording of the options – often GUI designers are locked in a constant battle between brevity and elegance over the risk of ambiguity. By introducing groups/categories, the brevity can be maintained while adding another layer of description.

Unfortunately, the standard ComboBox control has no provision for groups or categories; it is designed to be a flat list with no implied cohesion between the list items, and no hierarchy. Nevertheless, a number of applications (including Mozilla Firefox) have identified the need for a drop-down control with a grouping mechanism, and there are now many examples floating around in application land.

I have written GroupedComboBox in an attempt to provide a solution that is in-keeping with the existing principles of visual design and data binding used throughout Windows Forms. It is a drop-in replacement for the ComboBox, inheriting from it in order to reduce functional duplication. As is the case with much of the extended functionality in the standard ComboBox, the control must be bound to a data source in order to take advantage of grouping. Very little changes to existing code are required in order to use the grouping mechanism:

  • Set the value of the new GroupMember property to the name of the property you wish to group the list items by. (This functions in the same manner as the DisplayMember and ValueMember properties, so you can use a property, column name, etc)
  • Bind to a suitable data source (Array, IList, IListSource, ITypedList, DataView, etc). (Note: Arrays must be strongly-typed; object[] data sources expose no bindable properties.)
  • Due to the implementation, the items in the list will be inherently sorted. Lexiographical sorting is considered to be an aspect of best-practice user interface design. If you have different sorting requirements, consider using a more appropriate control.
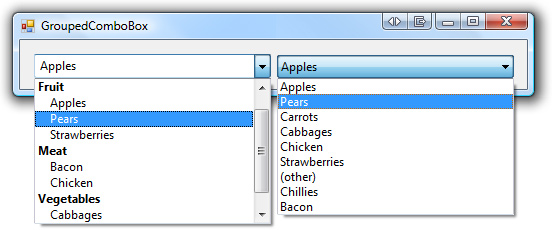
Comparison showing GroupedComboBox and ComboBox bound to the same data source.

Note: The visual style renderer on Windows Vista/7 uses a raised button effect when the DropDownStyle property is set to ComboBoxStyle.DropDownList and the DrawMode property is set to DrawMode.Normal, however it reverts to the classic rendering style when owner-drawing is enabled. There is no simple way to force the system style in this situation, therefore GroupedComboBox may visually clash with System.Windows.Forms.ComboBox if both types of controls appear on the same Form.

Some Background on Windows Forms Data Binding

If you use the data binding features in Windows Forms controls, you may be curious to know how values can be plucked from a data source using the DisplayMember/ValueMember/DataSource mechanism. The items in a data source are not of any one type; depending on the source, they can be primitive data types, objects with public properties, instances of System.Data.DataRowView or even a heterogenous collection of different types of items. The only constraint on data sources, in fact, is that they implement IList or IListSource.

So, given an object of an unpredictable type, how can we get the value of one of its properties? Well, firstly we need to understand the definition of a ‘property’ in the context of data binding; it does not necessarily refer to a get/set-style property, but rather an abstraction of one. This is what allows us to bind to columns in a DataView, or properties that may or may not exist in a heterogenous collection. The System.ComponentModel.PropertyDescriptor class is the mechanism we use to access the values of these abstracted properties.

PropertyDescriptor is an abstract class. Property descriptors are generally obtained from the data source, rather than from the list items themselves.  There are different implementations for different data sources; for example, System.ComponentModel.ReflectPropertyDescriptor uses Reflection to crawl a collection’s element types for their public properties, while the DataView uses System.Data.DataColumnPropertyDescriptor to represent its columns.

You can get property descriptors in a number of ways – sources that implement ITypedList expose them directly, while arrays and lists require the ListBindingHelper to retrieve them. Thankfully, the BindingSource component rounds them all up via its GetItemProperties() method. In situations (such as this example) where you have the name of the desired property as a string, you need simply enumerate through the list of property descriptors until you find one with a matching Name value.

// assume 'dataSource' is a data source that implements IList or IListSource and
// 'displayMember' is a string representing the property we want
BindingSource bindingSource = new BindingSource(dataSource, String.Empty);
PropertyDescriptor displayProperty = null;
foreach (PropertyDescriptor descriptor in bindingSource.GetItemProperties(null)) {
    if (descriptor.Name.Equals(displayMember)) {
        displayProperty = descriptor;
        break;
    }
}

Once you have an instance of PropertyDescriptor, you can call its GetValue() method for any item in the data source:

// assume 'listItem' is an object obtained from the data source
object displayValue = (displayProperty != null) ? displayProperty.GetValue(listItem) : null;

How GroupedComboBox Implements GroupMember

Bearing in mind the above, it is not difficult to extend this functionality to obtain a group-by value for our data source. My implementation shadows the ComboBox control’s DataSource property to transparently ensure that a BindingSource is used:

public new object DataSource {
    get {
        return (mBindingSource != null) ? mBindingSource.DataSource : null;
    }
    set {
        mBindingSource = (value != null) ? new BindingSource(value, String.Empty) : null;
    }
}

Having established that a BindingSource component will be available, we can look up the group-by value of each list item by matching the value of GroupMember to the Name property of one of the binding source’s PropertyDescriptor objects. There is, of course, always the chance that the data source will not have a matching property – should this happen, we will assume that a given list item is ungrouped.

Sorting List Items Into Groups

In order to be presented in groups, the list items must be specially sorted – firstly by group (if the list item is grouped), then by display value. We cannot assume that the data source is pre-sorted in this manner, or that it is even sortable at all, therefore we will use an internal sorted collection to enforce the order of the list items. For data sources containing reference types, there is only a small overhead in doing so (though for data sources containing value types, we are essentially duplicating the list). It is this sorted collection that the underlying ComboBox is bound to.

Since we are creating a sorted view of the original data source, the onice is on GroupedComboBox to stay in-sync with it. This is another compelling reason to use a BindingSource, as it provides the ListChanged event for compatible data sources (e.g. DataView). The sorted collection is rebuilt whenever the data source or GroupMember property is changed.

The two-tier sort is performed in the following manner (where ‘mGroupProperty‘ is the PropertyDescriptor object obtained earlier):

int IComparer.Compare(object x, object y) {
    int secondLevelSort = Comparer.Default.Compare(GetItemText(x), GetItemText(y));
    if (mGroupProperty == null) return secondLevelSort;

    int firstLevelSort = Comparer.Default.Compare(
        Convert.ToString(mGroupProperty.GetValue(x)),
        Convert.ToString(mGroupProperty.GetValue(y))
    );

    return (firstLevelSort == 0) ? secondLevelSort : firstLevelSort;
}

The most sensible collection to use internally in this case would be ArrayList, since we must select an IList, we know very little about the elements and we want to sort them.

Painting the List Items

To display the list items in a grouped form, we will have to paint them manually. This is not a hugely daunting task, but care must be taken in order to avoid exception-prone code and maintain the visual principles of Windows Forms controls. We will use the OwnerDrawVariable mode to paint the items, because it allows us to have some items drawn larger than others; in fact, the first item in each group will be twice as tall in order to accommodate the group header.

Given its index in the Items collection, a list item requires a header if:

  • It is at position 0 and has a non-empty group-by value, or:
  • It has a different group-by value to the item at [index – 1].

The height of an item in the drop-down portion of the ComboBox is the number of lines multiplied by the Height property of the Font. We calculate the size of each list item by handling the MeasureItem event. The item is then painted in the handler for the DrawItem event.

The TextRenderer class is very useful in rendering each item. Painting a list item is more than merely drawing the text, however. There are a number of flags of the DrawItemState enumeration (accessible through DrawItemEventArgs.State) that must influence the drawing code:

  • Selected – The mouse is hovering over the item. Under normal circumstances, the background will be painted with SystemBrushes.Highlightand the text will be painted in SystemColors.HighlightText.
  • Focus – The item has focus, which usually occurs in conjunction with being selected. A focus rectangle will need to be drawn around it, unless NoAccelerator is set. For new installations of Windows, accelerators are disabled by default.
  • ComboBoxEdit – When the ComboBox has its DropDownStyle set to DropDownList, the presence of this flag means that the item is being painted in the main part of the control. Different rules apply here:
    • When the control is in focus and the drop-down list is not showing, the item should appear as if it were highlighted.
    • When the control is not in focus, or if in focus but dropped down, the item should appear as if it were normal (undecorated).
    • In the case of the grouped combo box, we will not indent items or paint headers for groups in this state.
  • Disabled – This is found in conjunction with ComboBoxEdit, and indicates that the control’s Enabled property is set to false, therefore the text should be rendered using SystemColors.GrayText.

We have some additional stylistic requirements in this case, such as indenting all items with a non-empty group-by value and giving the impression that the group headers are not selectable (by suppressing the highlight and focus rectangle from them). We also want to render the headings in bold, to differentiate them further from the item text.

Example Usage

The following examples demonstrate how fundamentally different types of data sources can be used to produce the same output:

ArrayList of Anonymous Objects

GroupedComboBox groupedCombo = new GroupedComboBox();

groupedCombo.ValueMember = "Value";
groupedCombo.DisplayMember = "Display";
groupedCombo.GroupMember = "Group";

groupedCombo.DataSource = new ArrayList(new object[] {
    new { Value=100, Display="Apples", Group="Fruit" },
    new { Value=101, Display="Pears", Group="Fruit" },
    new { Value=102, Display="Carrots", Group="Vegetables" },
    new { Value=103, Display="Beef", Group="Meat" },
    new { Value=104, Display="Cucumbers", Group="Vegetables" },
    new { Value=0, Display="(other)", Group=String.Empty },
    new { Value=105, Display="Chillies", Group="Vegetables" },
    new { Value=106, Display="Strawberries", Group="Fruit" }
});

DataView

DataTable dt = new DataTable();
dt.Columns.Add("Value", typeof(int));
dt.Columns.Add("Display");
dt.Columns.Add("Group");

dt.Rows.Add(100, "Apples", "Fruit");
dt.Rows.Add(101, "Pears", "Fruit");
dt.Rows.Add(102, "Carrots", "Vegetables");
dt.Rows.Add(103, "Beef", "Meat");
dt.Rows.Add(104, "Cucumbers", "Vegetables");
dt.Rows.Add(DBNull.Value, "(other)", DBNull.Value);
dt.Rows.Add(105, "Chillies", "Vegetables");
dt.Rows.Add(106, "Strawberries", "Fruit");

groupedCombo.DataSource = dt.DefaultView;

String Array (grouped by word length)

groupedCombo.ValueMember = null;
groupedCombo.DisplayMember = null;
groupedCombo.GroupMember = "Length";

string[] strings = new string[] { "Word", "Ace", "Book", "Dice", "Taste", "Two" };

groupedCombo.DataSource = strings;

Final Words

This custom control is an example in enhancing GUI usability and correctly using both the Windows Forms data binding infrastructure and visual style guidelines. With the proper knowledge of how these features operate under-the-hood, I was able to create a component that recycles as much existing functionality as possible, is simple and easy to use in code and avoids breaks with convention that usually result in complex, clunky solutions. Of course, it does not give the ComboBox control a new, multi-level hierarchical structure, merely a categorisation mechanism – however, in this capacity, I hope you find it useful!

Download

Please visit the project page here: Drop-Down Controls

Preview Handlers are a concept introduced in Windows Vista (and supported in later operating systems). Most prominently used by Windows Explorer (and notably in Outlook 2007), they allow third-party developers to provide lightweight, interactive previews of data that can be hosted within other applications. You might use them to preview documents in a custom file explorer, or from somewhere that Windows Explorer cannot go, such as files stored as BLOBs in a database. Any exercise that involves reviewing or managing documents benefits extremely from a mechanism that will preview the content without opening another program, and this is it!

From an implementation perspective, preview handlers are basically borderless windows that are bound to a window or control in your application. Their operation and content can be controlled, but their UI is isolated. All preview handlers implement the COM interface IPreviewHandler and are associated with file formats within the Windows Registry. At the time of writing, there is no official managed API for hosting preview handlers in Windows Forms applications, so I have written my own.

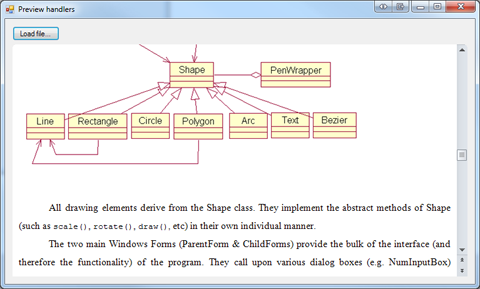
Windows Forms app with an embedded Microsoft Word previewer

In my implementation, PreviewHandlerHost is a custom control to which the preview handler is bound. With each filename/stream that is opened, the appropriate handler is loaded and displayed. To display a preview handler in a Windows Forms app, given the filename of the content you want to preview, the following must be performed:

  • Locate the registry key in HKEY_CLASSES_ROOT that corresponds to the file extension. Within the ShellEx key, there should be a key with the GUID {8895b1c6-b41f-4c1c-a562-0d564250836f}. Within this key, there should be a GUID that identifies the COM type that implements IPreviewHandler. If you cannot locate the key here, try the file type’s class key – this corresponds to the default value of the first key mentioned above.
private Guid GetPreviewHandlerGUID(string filename) {
    RegistryKey ext = Registry.ClassesRoot.OpenSubKey(Path.GetExtension(filename));
    if (ext != null) {
        RegistryKey test = ext.OpenSubKey("shellex\\{8895b1c6-b41f-4c1c-a562-0d564250836f}");
        if (test != null) return new Guid(Convert.ToString(test.GetValue(null)));

        string className = Convert.ToString(ext.GetValue(null));
        if (className != null) {
            test = Registry.ClassesRoot.OpenSubKey(className + "\\shellex\\{8895b1c6-b41f-4c1c-a562-0d564250836f}");
            if (test != null) return new Guid(Convert.ToString(test.GetValue(null)));
        }
    }

    return Guid.Empty;
}
  • Using reflection (since there is no assembly or type library we can use), create an instance of the preview handler (using Type.FromCLSID() and Activator.CreateInstance()).
Type comType = Type.GetTypeFromCLSID(mCurrentPreviewHandlerGUID);
mCurrentPreviewHandler = Activator.CreateInstance(comType);
  • Depending on the type, initialise the preview handler with a filename (IInitializeWithFile) or a stream containing the content to preview (IInitializeWithStream).
if (mCurrentPreviewHandler is IInitializeWithFile) {
    ((IInitializeWithFile)mCurrentPreviewHandler).Initialize(filename, 0);
}
else if (mCurrentPreviewHandler is IInitializeWithStream) {
    mCurrentPreviewHandlerStream = File.Open(filename, FileMode.Open);
    StreamWrapper stream = new StreamWrapper(mCurrentPreviewHandlerStream);
    ((IInitializeWithStream)mCurrentPreviewHandler).Initialize(stream, 0);
}
  • Bind the preview handler to the control you want to host it in (you can limit it to a region within the control’s bounds) and activate it.
Rectangle r = ClientRectangle;
((IPreviewHandler)mCurrentPreviewHandler).SetWindow(Handle, ref r);
((IPreviewHandler)mCurrentPreviewHandler).DoPreview();

There are some hurdles involved in getting the COM types into .NET:

  • The relevant COM interfaces have to be manually declared and mapped using the [ComImport] attribute (so it is necessary to know their GUIDs and structure).
  • IInitializeWithStream cannot be used directly with System.IO.Stream, so it was necessary to write a wrapper class that implements System.Runtime.InteropServices.IStream.
  • The usual COM clean-up routine is required (Marshal.FinalReleaseComObject()) in order to release resources – this is integrated into the control’s Dispose() method.

The finished control can simply be dropped onto a Form, and will display the preview after a call to the Open() method. If you resize the control while a preview handler is active, it will be resized accordingly. If no file has been loaded or an error is encountered, it will be displayed on the empty control. You can also explicitly unload a file by calling UnloadPreviewHandler(). Preview handlers may have transparent backgrounds (for example, the Microsoft Office handlers use rounded borders), so the control permits this.

Final Words

Preview handlers are a powerful addition to file explorers, document management systems and the like, and they can be harnessed for use in .NET as well. Unfortunately, however, they are not the only mechanism that Windows Explorer and other previewers use to display content. Under Vista and Windows 7, for example, there are no preview handlers registered for images, plain text documents or HTML files. That means that PreviewHandlerHost is far from a holistic solution. Rather, it should be combined with existing constructs to preview a fuller range of file formats. However, in testing I was able to demonstrate support for most major office document formats and media files.

I hope you find it useful 🙂

Download

There is a newer version of this code available here: Preview Handlers Revisited

PreviewHandlers.cs

Note: You must add a reference to the System.Design assembly in order to compile the source code.
Also, there is a known issue where the Windows Media Player 11 preview handlers leave behind a black rectangle after unloading.

There are a number of things that SQL, for all of its good points, isn’t very good at; for example, FOR loops and expressions with horizontal references. One thing that it seems to be particularly bad at is dealing with hierarchical data (i.e. self-referencing tables with multiple levels of recursion). Fortunately, since SQL Server 2005, a very useful mechanism has existed for dealing with this kind of data: recursive common table expressions (CTEs).

In this example, I will show you how to produce a directory listing that shows full path names, given the following table structure:

E-R Diagram

(Obviously, this is a simplification; a useful folder representation would include columns for creation date, attributes, etc)

The generalised form for a recursive CTE is:

WITH [cte-name] as (
    SELECT [select-list] FROM [table-name]
    UNION ALL
    SELECT [select-list] FROM [cte-name] JOIN [table-name]
)
SELECT [select-list] FROM [cte-name]

You must include both a subquery for the anchored part of the CTE as well as a subquery that joins to the CTE itself. For our example, the anchored part would be the set of folders without a parent (i.e. ParentID IS NULL). The concatenatation of the folder name and the path above it is performed in the recursive subquery. The directory listing query looks like this:

WITH DirListing as (
 SELECT FolderID, FolderName
 FROM Folders
 WHERE ParentID IS NULL

 UNION ALL

 SELECT Folders.FolderID, DirListing.FolderName+'\'+Folders.FolderName as [FolderName]
 FROM DirListing INNER JOIN Folders ON Folders.ParentID=DirListing.FolderID
)
SELECT FolderName FROM DirListing ORDER BY FolderName

For the following sample data in Folders:

FolderID FolderName ParentID
1 Fruit NULL
2 Vegetables NULL
3 Meats NULL
4 Spices NULL
5 Apples 1
6 Granny Smith 5
7 Golden Delicious 5
8 Fuji 5
9 Pink Lady 5
10 Oranges 1
11 Valencia 10
12 Blood 10
13 Peaches 1
14 Capsicums 2
15 Red 14
16 Green 14
17 Yellow 14
18 Cucumbers 2
19 Carrots 2
20 Celery 2

The directory listing query will produce the following output:

Fruit
Fruit\Apples
Fruit\Apples\Fuji
Fruit\Apples\Golden Delicious
Fruit\Apples\Granny Smith
Fruit\Apples\Pink Lady
Fruit\Oranges
Fruit\Oranges\Blood
Fruit\Oranges\Valencia
Fruit\Peaches
Meats
Spices
Vegetables
Vegetables\Capsicums
Vegetables\Capsicums\Green
Vegetables\Capsicums\Red
Vegetables\Capsicums\Yellow
Vegetables\Carrots
Vegetables\Celery
Vegetables\Cucumbers

(20 row(s) affected)

In addition to using this construct to list the paths, you can also use it to return the full path for a single FolderID, or to perform a reverse-lookup for a FolderID given the path name. This makes it very handy for creating a file system abstraction within a database system.

1 Fruit NULL
2 Vegetables NULL
3 Meats NULL
4 Spices NULL
5 Apples 1
6 Granny Smith 5
7 Golden Delicious 5
8 Fuji 5
9 Pink Lady 5
10 Oranges 1
11 Valencia 10
12 Blood 10
13 Peaches 1
14 Capsicums 2
15 Red 14
16 Green 14
17 Yellow 14
18 Cucumbers 2
19 Carrots 2
20 Celery 2
NULL NULL NULL

In an earlier post, I looked at a closed-bucket hashtable implementation based around Dictionary<TKey, LinkedList<TValue>>. Although this achieved the goals of having fast insertion, deletion and retrieval time, it also had a few shortcomings:

  • The collection is unsorted and cannot be sorted because it is orderless (the only way to guarantee sorting is to insert pre-sorted elements in order)
  • Searching for a value (whose key is unknown) is O(n) due to the use of linked lists as a bucket structure

I decided to revisit the CBHT class. Firstly, I wanted to refactor the code to derive a common base class. Then, extending this class, I wanted to provide an alternative implementation that was sorted (using a 2-tier sort; first by key and then by value) and provided faster searches.

CBHTBase<TKey, TValue>

The base type is a generic abstract class that conceals a lot of repeated functionality that arises from implementing multiple collection interfaces. It also hides the explicit interface implementations (which provide compatibility when the class is used in a less specific capacity). The result is considerably fewer methods and properties to implement in the concrete classes; only the following are abstract:

  • KeyCount
  • Keys
  • this[TKey key]
  • Add(TKey key, TValue value)
  • Clear()
  • ContainsKey(TKey key)
  • GetEnumerator()
  • Remove(TKey key)

SortedCBHT<TKey, TValue>

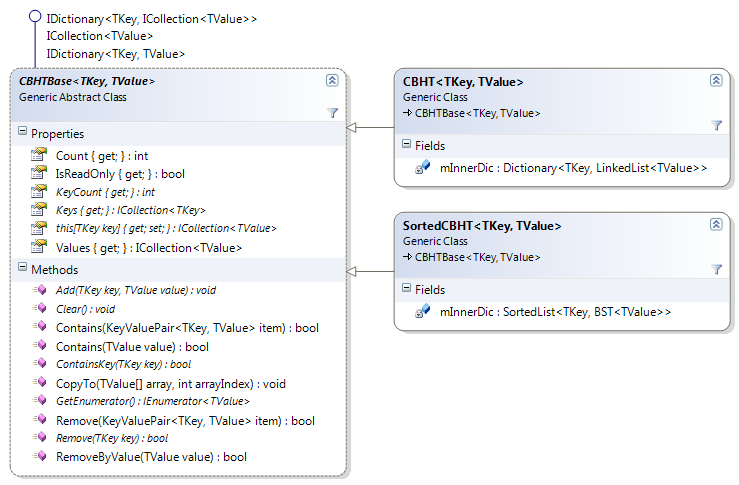
The sorted CBHT implementation must be based around two sorted types; one to represent the collection of buckets and one to represent the structure of the buckets themselves.

There are two built-in collections in the .NET Framework that are sorted by key; SortedList<TKey, TValue> and SortedDictionary<TKey, TValue>. Both classes are implemented using BSTs and both have similar characteristics. I have opted for SortedList<TKey, TValue> because:

  • It is conceptually closer to the array model for hashtables
  • The Keys and Values properties are indexed and aren’t regenerated when the collection changes
  • In my own tests with large numbers of randomly-generated keys, it outperforms SortedDictionary<TKey, TValue>

For the bucket structure, I have a ready-made solution in the form of the generic BST class I wrote for the last post. It is implicitly sorted by value and searches faster than a linked list.

Class Diagram

Class diagram for the sorted CBHT implementation

Final Words

Each of the two CBHT implementations has its strengths and weaknesses; the sorted version is much faster at searching, but slower at insertion. The unsorted version is faster at insertion and retrieval, but cannot be sorted and is much slower at searching. It is worthwhile to note that tests using large numbers of random keys and values showed that the bottleneck caused by searching in the unsorted version is greater than the performance defecit caused by insertion in the sorted version. Each therefore has its own use in future projects.

Download

SortedCBHT.cs (includes dependant classes)