I’ve been taking a break from my usual work in C#/WinForms to improve my web development skills. As such, i’ve been learning PHP, HTML5, jQuery and CSS3, among other things.
I recently had an opportunity to work with the Google Maps API to create a map that shows the locations of a large set of users. In doing so, I discovered some useful extensions that improve the appearance, functionality and performance of the user map. In this post, i’ll share some of those with you as I walk through the process of creating such a map.
Google Maps API
The Google Maps API is available on a few different platforms, but the one we’ll be using is the JavaScript version. This allows us to create the map and add the markers after the page loads, using a script. To use the Maps API, load the script in the <head> section of your page:
<script type="text/javascript" src="https://maps.googleapis.com/maps/api/js?sensor=true&v=3.exp"></script>
Step 1: The location data
The first step is to assemble the data that will populate the markers on the map. For the purposes of this post, i’m going to limit this data to:
- The name of the user
- A URL to the user’s avatar (a small image file)
- The user’s location – latitude (+ve = North, -ve = South) and longitude (+ve = East, -ve = West), ideally stored in separate fields
The source and representation of this data will be application-specific (e.g. PHP/MySQL, C#/MS-SQL, etc), so it must first be transformed into a useful format that can be read using JavaScript. JSON is by far the simplest option for this. In my case, working with PHP, all I need do is query the data from the database and encode the resulting associative array using the json_encode() method. In .NET, JSON support can be added using a library like Json.NET.
A neat way of loading your data so it can be accessed by the user map script is to wrap the JSON in an assignment statement, effectively turning it into an executable script itself:
var external_data = [ {"username":"user1", "url":"user1.png", "lat":"-31.94", "lng":"115.87"}, {...} ];
If this script is dynamically generated, all you need do is add it to your <head> element after the Maps API:
<script type="text/javascript" src="my_data_source_url.json"></script>
Step 2: Embedding a map
It’s almost fiendishly simple to embed a Google Map on a page. The only markup required is a <div> with a class/ID that you can reference in the script. It’s a good idea to wrap this inside another <div> to give you more flexibility when applying styles:
<div id="google-map-container">
   <div id="google-map"></div>
</div>
Everything else is done in JavaScript. To initialise the map, we need to pass a few parameters to its constructor; the coordinates the map is centered on, the zoom level and the type of map (road/satellite/etc):
var center = new google.maps.LatLng(-31.9554, 115.8585);

var map = new google.maps.Map(document.getElementById('google-map'), {
    zoom: 9,
    center: center,
    mapTypeId: google.maps.MapTypeId.ROADMAP
});
The above code runs after the page has loaded (in jQuery, you can use the $(document).ready() function for this).
Step 3: Creating map markers
The conventional way to create a map marker is to instantiate the google.maps.Marker class and pass the map, coordinates and other properties to its constructor. While you can customise the appearance of a marker to some degree (including by replacing the icon with a custom image), they do not offer as much flexibility as I would like. For my user map, I want to be able to control the style of the markers using CSS – which means I need to be able to apply classes to them.
Thankfully, there is an extension to the API which builds on the basic marker, giving you the choice of specifying the content using HTML markup instead. To use the RichMarker class, add the following to your <head> tag:
<script type="text/javascript" src="https://google-maps-utility-library-v3.googlecode.com/svn/trunk/richmarker/src/richmarker-compiled.js"></script>
You can then create a marker using the following code (assume the variable user is an element taken from the location data):
var marker = new RichMarker({
    map: map,
    position: new google.maps.LatLng(user.lat, user.lng),
    content: '<img src="' + user.url + '" title="' + user.username + '" class="my-map-marker" />'
});
You can then apply a style to the my-map-marker class in a stylesheet.
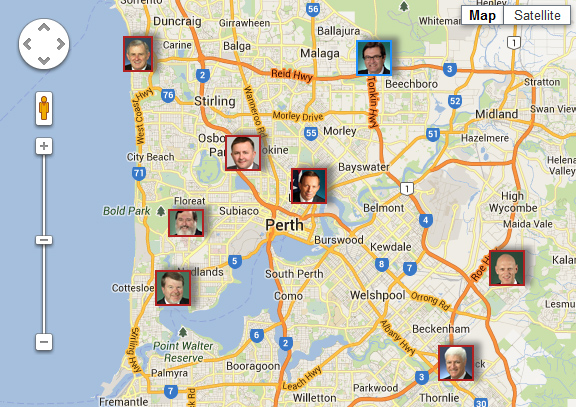
However, there is a problem associated with this approach; performance degrades when you add a large number of markers to the map. Since we want to display a large number of users on our map, this is highly undesirable.
Thankfully, there is another very useful extension to the Maps API that addresses this problem: MarkerCluster dynamically reduces markers in close proximity to each other into ‘cluster’ markers, which display the number of markers contained within them. As you zoom in, clusters are replaced by smaller clusters, and finally by the markers themselves. You can click on a cluster to zoom in to the appropriate level required to display all included markers. To use this extension, add the following to your <head> tag:
<script type="text/javascript" src="https://google-maps-utility-library-v3.googlecode.com/svn/trunk/markerclusterer/src/markerclusterer_compiled.js"></script>
Instead of directly associating the markers with the map object, we add them to an array and pass this to the MarkerCluster class:
var markers = [];
for (var i = 0; i < external_data.length; i++) {
    var user = external_data[i];

    var marker = new RichMarker({
        position: new google.maps.LatLng(user.lat, user.lng),
        content: '<img src="' + user.url + '" title="' + user.username + '" class="my-map-marker" />'
    });

    markers.push(marker);
}

var cluster = new MarkerClusterer(map, markers);
This object now becomes responsible for controlling which markers are displayed on the map at any given time. Its behaviour can be customised, but the defaults are quite sensible for our scenario.
…and that’s it – everything you need to create a map showing the locations of your users.
Next steps
Now that we’ve got our user map up and running, we can start building additional functionality, such as interactivity. To capture when the user clicks on a map marker, attach an event handler using the following syntax:
google.maps.event.addListener(marker, 'click', my_click_handler_function);
The event handler function has a single parameter containing a MouseEvent object, which has a latLng property describing the location on the map that was clicked (i.e. the location of the marker).
The Maps API provides a built-in InfoWindow class, which you can use to display a ‘speech bubble’ callout containing the HTML markup of your choice. It works like this:
function my_click_handler_function(evt) {
    infoWindow = new google.maps.InfoWindow({
        position: evt.latLng,
        content: 'Show information about the user here'
    });
}
By setting the marker’s draggable property to true, you can allow the user to move the marker around on the map. You can handle this using the dragstart and dragend events. For example, you could update the current user’s location by making an AJAX call when the user finishes dragging the point.
I’ve shown how to create markers from a simple data source, but you might derive marker locations from other sources that are available at run-time. If the browser supports geolocation (most modern browsers do), you can create a marker from the user’s current location:
if (navigator.geolocation) {
    navigator.geolocation.getCurrentPosition(
        function (position) {
            // called if the location is found
            var latLng = new google.maps.LatLng(position.coords.latitude, position.coords.longitude);

            /* create a marker here */
        },
        function () {
            // called if an error occurs
            alert('Unable to determine your location.');
        }
    );
}
If you don’t have exact map coordinates for a marker, you can use the Google Places API to obtain the coordinates given a place name (or search term). To do this, you must add &libraries=places to the URL for the main API script. See the Places API documentation for more on how to transform a place name into map coordinates.
Final words
Integrating Google Maps into a web application is much simpler than you might think. By adding your own data to the map (in this case, locations of users) in the form of markers, you can combine the power of both systems and create genuinely useful features for your site. Hopefully, my suggestions and pointers in this area will help to make your Maps integration faster, smoother and more elegant.
Hi Brad,
Thanks to you, I managed to use the RichMarker API easily, since the original example sucks and full of things that I don’t need. In your example I get exactly what I need not more than that, clean and nit, it’s very useful and easy to understand.
You have a small typo instead of:
var cluster = new MarkerCluster(map, markers);
you need to write:
var cluster = new MarkerClusterer(map, markers);
Thanks for your great effort.
Best regards,
Chen
Thanks! I’ll be sure to correct that typo 🙂